Heat Pump Installation UK: The Complete Guide
Over 250,000 UK homes switched to a heat pump last year, and the numbers are rising fast. If you are considering joining them, one question towers above the rest: what does the installation actually involve? A well-installed heat pump will heat your home and hot water for 20 to 25 years, slash your carbon emissions, and in many cases reduce your energy bills by hundreds of pounds annually. But the process can feel daunting if you have never been through it before.
This guide walks you through every stage of a heat pump installation in the UK — from your first enquiry right through to handover and beyond. Whether you are considering an air source heat pump or a ground source system, the fundamental process follows the same path. Understanding it will help you make better decisions, avoid costly pitfalls, and end up with a system that performs brilliantly for decades.
Find out what installation will cost for your home
Try the free calculatorGet a personalised estimate in under 2 minutes — no email required.
Stage 1: The Initial Enquiry and Heat Loss Survey
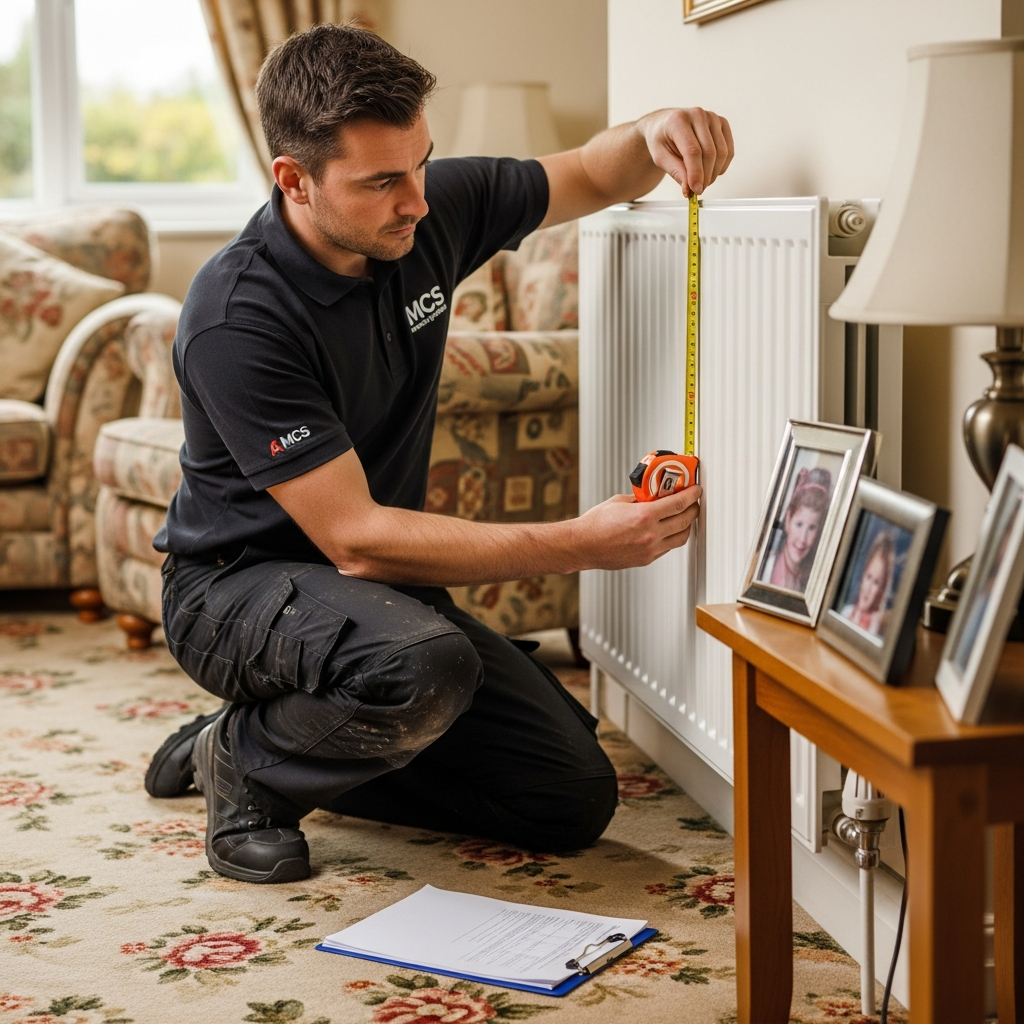
Every proper heat pump installation starts with a detailed heat loss survey. This is not a quick glance at your home — it is a room-by-room assessment that determines exactly how much heat your property loses and therefore how much heat the pump needs to deliver.
What happens during a heat loss survey?
An MCS-certified surveyor will visit your home and measure every room. They record wall construction, insulation levels, window types, floor areas, ceiling heights, and the orientation of each wall. They note draughts, check loft insulation depth, and assess your existing radiators or underfloor heating.
This data feeds into MCS-approved design software that calculates the peak heat demand for each room and for your home as a whole. The result — measured in kilowatts (kW) — determines what size heat pump you need.
Why the survey matters so much
An undersized heat pump will not keep your home warm on the coldest days. An oversized one will cost more to buy and may cycle on and off inefficiently, increasing wear and reducing lifespan. The heat loss survey is the foundation of the entire installation — skip it or rush it and everything else suffers.
A thorough survey takes 90 minutes to three hours. If a company offers to quote without visiting your home, that is a significant red flag. Use our suitability checker to get an initial sense of whether a heat pump suits your property, but always insist on a proper on-site survey before committing.
Stage 2: System Design and Quotation
After the survey, the installer designs your system. This includes selecting the right heat pump model, determining whether your existing radiators are adequate (or whether some need upgrading), specifying the hot water cylinder, planning the pipework routes, and identifying where the outdoor unit will sit.
What a good quote includes
A proper quote should itemise everything:
- Heat pump unit: Make, model, and output capacity
- Hot water cylinder: Size and specification (typically 150 to 250 litres)
- Radiator upgrades: Which radiators need replacing and why
- Pipework: Route from outdoor unit to indoor system
- Electrical work: Any consumer unit upgrades needed
- Controls: Thermostat, zone valves, weather compensation
- BUS grant deduction: The £7,500 grant should be shown as a deduction
- Total cost after grant: What you actually pay
Always get at least three quotes from different MCS-certified installers. This gives you a range of prices and approaches to compare. Typical costs after the BUS grant range from £2,500 to £7,000 for most homes — check our full cost guide for detailed breakdowns.
Stage 3: Grant Application and Planning
Once you have chosen your installer, two things happen in parallel: the grant application and any necessary planning or preparation work.
BUS grant application
Your installer submits the Boiler Upgrade Scheme application to Ofgem on your behalf. You need to provide consent and some basic property information, but the installer handles the paperwork. Approval typically takes two to four weeks. The voucher is valid for three months, giving a reasonable window for the installation to take place.

Planning permission
Most air source heat pump installations fall under permitted development rights, meaning no planning permission is needed provided the system meets certain conditions — including noise limits and positioning at least one metre from the property boundary.
Ground source heat pumps typically do not need planning permission either, though horizontal ground loops require sufficient garden space and vertical boreholes may need a permit from the Environment Agency.
Listed buildings, properties in conservation areas, and flats always need to check with the local planning authority first.
Not sure if your home qualifies for the £7,500 grant?
Get free quotes and find outMCS-certified installers handle the entire grant application for you.
Stage 4: Pre-Installation Preparation
Before the installers arrive, there are a few things to sort out:
What the installer prepares
- Equipment ordering: Heat pump, cylinder, radiators, pipework, fittings, controls — everything arrives on site on day one
- Scaffolding (if needed): Occasionally required for high-level pipework or difficult access
- Electrical assessment: Confirming your consumer unit can handle the heat pump's electrical demand
What you need to do
- Clear the area where the outdoor unit will be installed — typically a concrete pad or pre-cast base alongside the house
- Clear space for the hot water cylinder if one is being installed (usually an airing cupboard or utility room)
- Move furniture away from radiators that are being replaced
- Make sure there is clear access for the installers to move between rooms and carry equipment
- Accept that there will be some disruption — dust, noise, and temporary loss of heating and hot water
Stage 5: Installation Day by Day
A typical air source heat pump installation takes two to four days. Here is what happens on each day, based on a standard three-bedroom semi:
Day 1: Out with the old
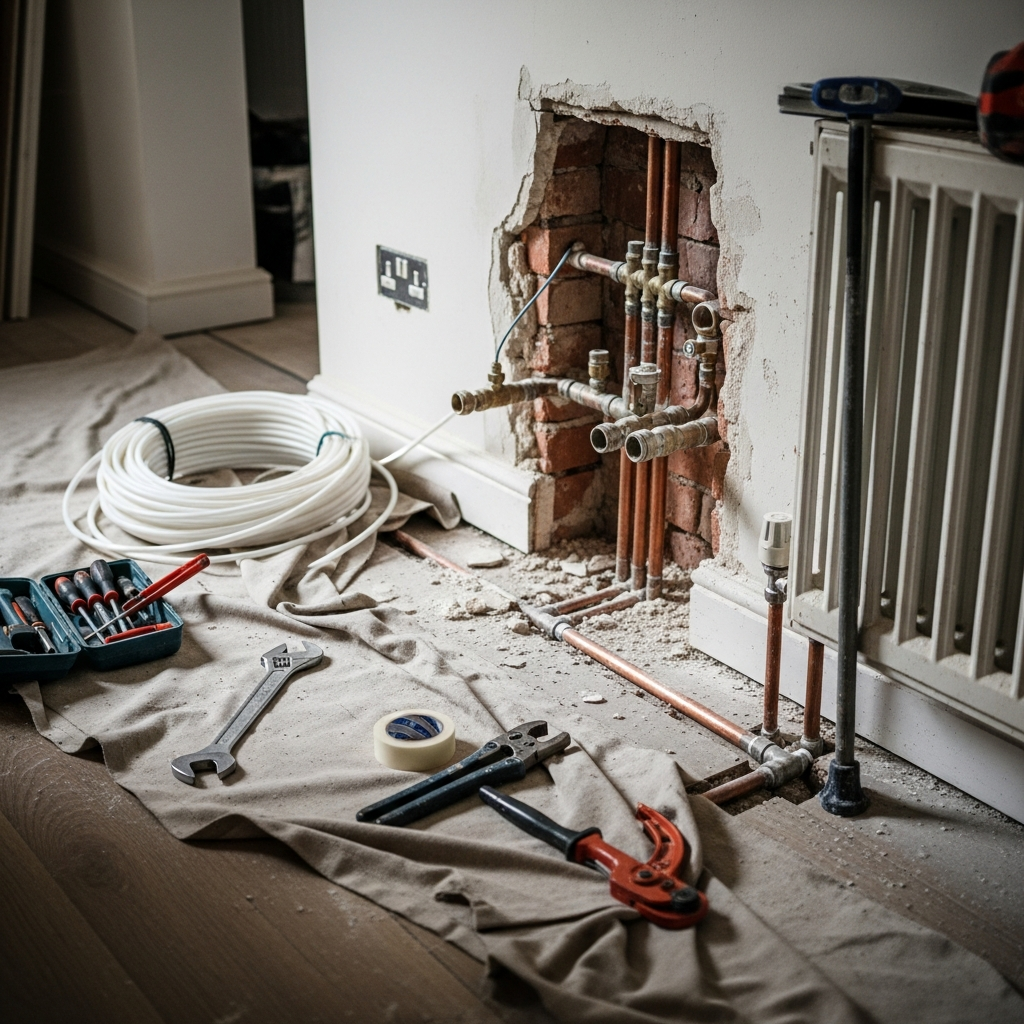
The existing boiler is drained and disconnected. If you have a traditional system with header tanks in the loft, those come out too. The old system is drained down and the boiler is removed. The installers may also start preparing the base for the outdoor heat pump unit and begin routing new pipework.
You will have no heating or hot water from this point until the new system is commissioned. If the installation is in winter, plan accordingly — electric heaters, extra blankets, and patience.
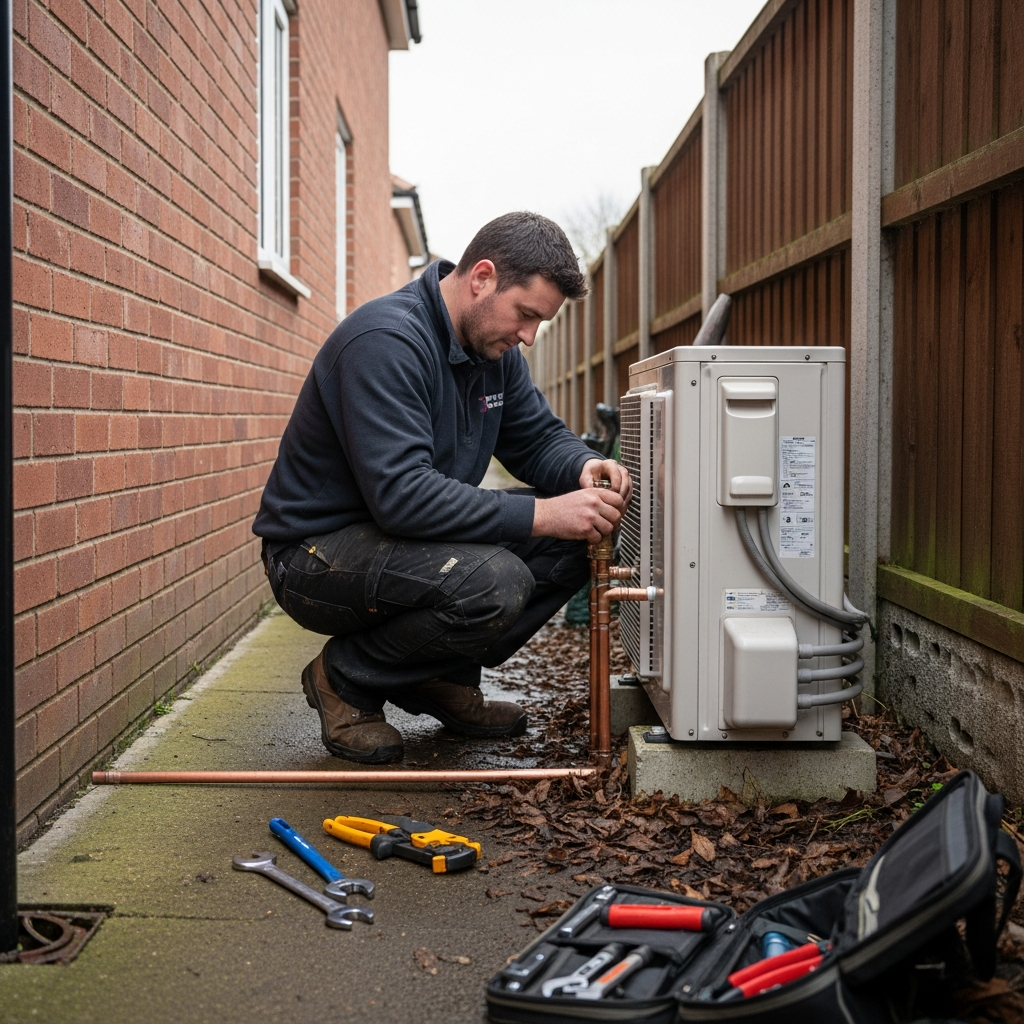
Day 2: The new system goes in
The outdoor heat pump unit is positioned on its base and secured. The hot water cylinder is installed indoors. Pipework is run from the outdoor unit through the external wall to the indoor system, fully insulated to prevent heat loss and condensation. Any new or upgraded radiators are fitted.
Day 3: Connections and controls
The electrical connection is made — either by the installation team's qualified electrician or a separate electrical contractor. The system is filled, pressurised, and leak-tested. Controls are wired in, including the room thermostat, weather compensation sensor, and any zone controls. The system is powered on for initial testing.
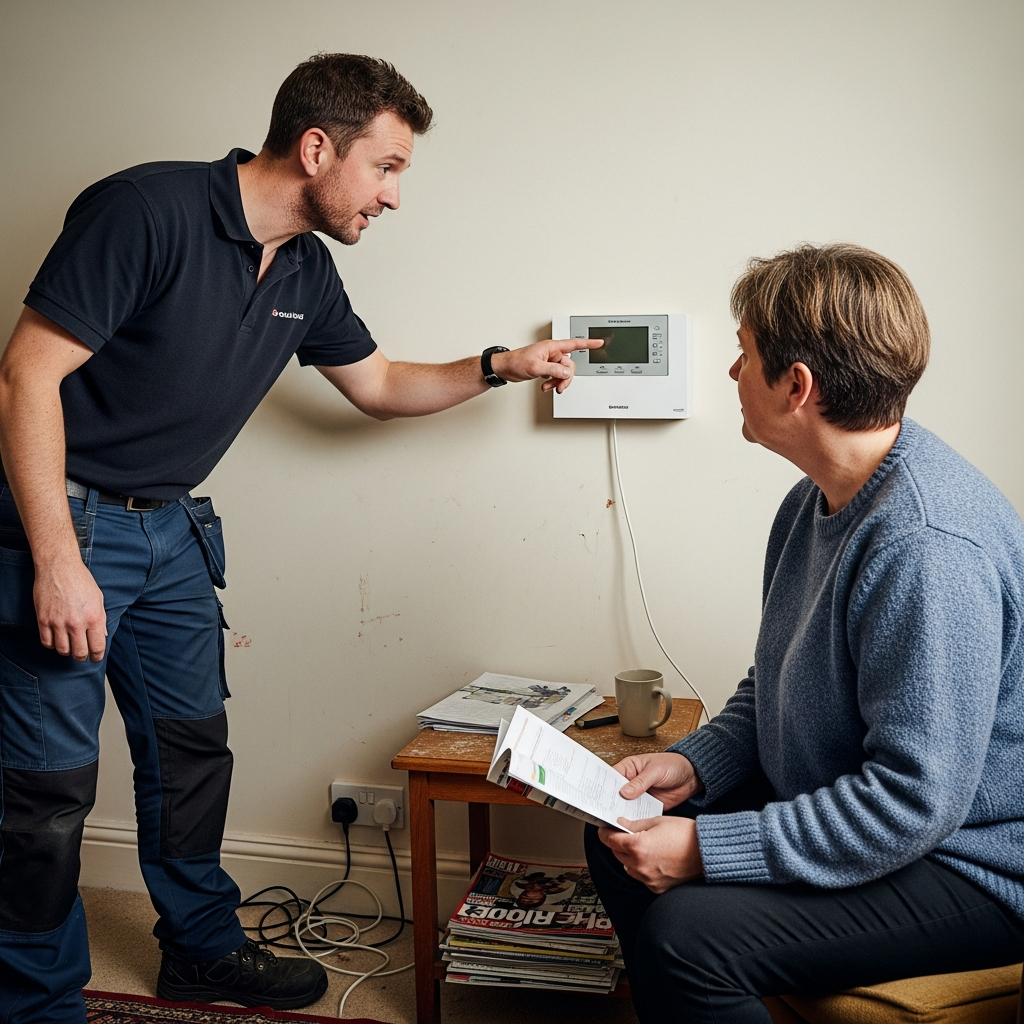
Day 4 (if needed): Commissioning and handover
The system is formally commissioned according to MCS standards. The installer checks flow temperatures, heat output, hot water performance, and system pressures. They programme the controls, set the heating schedules, and adjust the weather compensation curve to suit your home. Then they walk you through how everything works.
| Day | Key tasks | Duration |
|---|---|---|
| Day 1 | Boiler removal, base prep, pipework routing | 6-8 hours |
| Day 2 | Unit positioning, cylinder install, radiator upgrades | 8-10 hours |
| Day 3 | Electrical work, filling, pressure testing, controls | 6-8 hours |
| Day 4 | Commissioning, programming, homeowner handover | 4-6 hours |
Stage 6: Commissioning
Commissioning is the formal process of verifying that the heat pump system is working correctly and efficiently. It is an MCS requirement and should not be skipped or rushed.
What commissioning involves
- Flow temperature checks: Verifying the system delivers heat at the designed flow temperatures (typically 35 to 45 degrees Celsius for a well-insulated home)
- Heat output measurement: Confirming each radiator delivers the expected heat output
- Hot water performance: Testing that the cylinder reaches the required temperature (typically 48 to 55 degrees Celsius, with periodic legionella pasteurisation cycles to 60 degrees)
- System pressure: Checking and recording the operating pressure
- Electrical safety: Verifying all electrical connections are safe and comply with Part P regulations
- Noise levels: Confirming the system operates within planning and MCS noise limits
- Weather compensation setup: Programming the heating curve so the system adjusts output based on outdoor temperature
Stage 7: Handover
The handover is when the installer formally passes the system to you. A good handover includes:
Documentation you should receive
- MCS installation certificate
- Manufacturer's warranty documents (typically 5 to 10 years)
- Building regulations compliance certificate (or notification through the Competent Persons Scheme)
- Commissioning record
- System design documentation showing heat loss calculations
- User guide for the controls
- Emergency contact details for the installer
What you should understand before the installer leaves
- How to adjust the heating temperature and schedule
- How the hot water works and when it heats
- What the normal operating pressures are
- What the weather compensation setting does and why you should leave it alone
- When to book the first annual service
- What counts as normal behaviour (defrost cycles, fan noise at different speeds)
Air Source vs Ground Source: Installation Differences
The stages above apply to both types, but there are key differences:
Air Source
2-4 days
Outdoor unit on concrete base, single wall penetration, minimal garden disruption
Ground Source (Horizontal)
1-2 weeks
Trenches 1-1.5m deep across 200-400m² of garden, plus indoor installation
Ground Source (Borehole)
1-2 weeks
Drilling rig bores 75-200m deep, less garden space needed, higher cost
How Much Does Heat Pump Installation Cost?
For a typical three-bedroom semi-detached home:
Costs vary depending on your home's size, insulation level, how many radiators need upgrading, and regional labour rates. If you are also considering solar panels to offset electricity costs, a combined approach can reduce running costs even further. Use our heat pump calculator for a personalised estimate, or get free quotes from local MCS-certified installers.
Common Installation Mistakes to Avoid
Understanding these common pitfalls will help you get a better installation:
- Skipping the heat loss survey: No proper survey means no proper system design. Insist on a room-by-room assessment
- Oversizing the heat pump: Bigger is not better. An oversized pump cycles on and off, reducing efficiency and increasing wear
- Not upgrading radiators where needed: Heat pumps run at lower temperatures than boilers. Some radiators may need to be larger to deliver enough heat
- Poor pipework insulation: Uninsulated or poorly insulated pipework between the outdoor unit and your home wastes energy
- Setting flow temperatures too high: Running at 55 degrees like a boiler defeats the purpose. A well-designed system should run at 35 to 45 degrees
- Choosing on price alone: The cheapest quote may mean cut corners. Quality of design and installation determines long-term performance
Ready to find out what your installation will cost?
Get free quotes from MCS-certified installersCompare up to 3 quotes from vetted local installers — no obligation.
After Installation: The First Few Weeks
A heat pump works differently from a boiler, and it takes a little time to adjust. Here is what to expect:
- Lower radiator temperatures: Your radiators will feel warm rather than hot. This is normal — the system is designed to provide gentle, consistent heat rather than short blasts of high-temperature heat
- Longer run times: Heat pumps run for longer periods at lower intensity. Leaving the system on for extended periods (or continuously) is more efficient than short on-off cycles
- Defrost cycles: In cold weather, the outdoor unit will periodically reverse to defrost the evaporator. You may see steam and hear the fan change speed. This is completely normal
- Weather compensation adjustments: Your installer may need to tweak the heating curve over the first few weeks. Some installers offer a follow-up visit after a month to fine-tune settings
The key thing is to resist the urge to crank up the temperature. Let the system run as designed, and if something does not feel right after a couple of weeks, contact your installer to adjust the settings rather than overriding them. Pairing your heat pump with a solar panel system can further reduce electricity costs during those longer daytime running hours.

Frequently Asked Questions
How long does a heat pump installation take?
A typical air source heat pump installation takes 2 to 4 days. Ground source installations take 1 to 2 weeks including the ground works.
Do I need planning permission for a heat pump?
Most domestic air source heat pump installations fall under permitted development rights and do not need planning permission. Check with your local authority if you live in a listed building, conservation area, or flat.
Can I install a heat pump myself?
You could technically buy and install a heat pump, but you would not be eligible for the £7,500 BUS grant (which requires an MCS-certified installer) and the work must comply with building regulations. Self-installation is not recommended.
Will I need a new hot water cylinder?
If you currently have a combi boiler (no cylinder), yes — you will need a hot water cylinder installed. If you already have a cylinder, it may need upgrading to one with a larger coil suited to heat pump temperatures.
What happens to my old boiler?
Your installer removes and disposes of the old boiler as part of the installation. This is normally included in the quoted price.
How disruptive is installation?
Expect 2 to 4 days of disruption including some noise, dust from drilling, and temporary loss of heating and hot water. Most homeowners find it comparable to having a new bathroom fitted — noticeable but manageable.
Do I need to upgrade my electrical supply?
Most homes have sufficient electrical capacity for a heat pump. Your installer will check during the survey. Occasionally a consumer unit upgrade is needed, which adds £200 to £400 to the cost.
What maintenance does a heat pump need?
An annual service by a qualified engineer, similar to a boiler service. You should also keep the outdoor unit clear of leaves and debris, and check the system pressure periodically.
About Heat Pump Installation in the UK
Heat pump installation is a key part of the UK's transition to low-carbon heating. The Boiler Upgrade Scheme (BUS) provides £7,500 grants to help homeowners replace gas boilers with air source or ground source heat pumps. All grant-eligible installations must be completed by MCS-certified installers who follow strict quality standards. Heat pumps work alongside other renewable technologies — including solar panels and improved insulation — to reduce energy bills and carbon emissions. The UK government aims to install 600,000 heat pumps per year by 2028 as part of its net zero strategy.